Reverse Billing
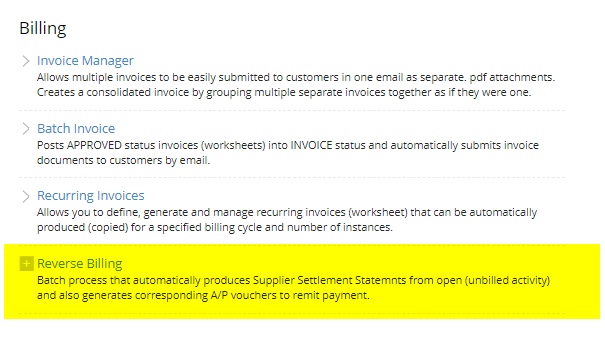
cieTrade contains a Reverse Billing module that is specifically designed to automate the process of posting payables and printing shipping statements in batch for your suppliers. This module directly corresponds with the automation settings that are available on the Counterparty profile, allowing clients to activate and assign billing automation properties such as billing cycle, statement type, and a reporting unit of measure on a supplier by supplier basis. When this feature is run, it will look to these Counterparty settings in combination with the statement selection criteria to generate a new batch of payables. From here, users can post payables immediately, print statements in batch, or return to the batch at a later date to perform these activities.
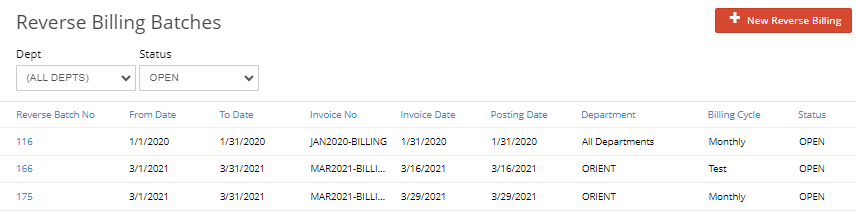
On the inquiry itself, you have the ability to filter by Department and Status, in order to view all Reverse Billing Batches that have been generated previously. This allows you to save the batch before posting the statements, if changes are required after generating the statements.
 Setup
Setup
 Setup
SetupBefore you can begin using Reverse Billing, there are a few items that will need to be setup first.
Enable Feature
- Navigate to Settings > Preferences > System Options.
- Enable the setting Use Reverse Billing. This will enable fields and drop downs throughout the system.

Define Billing Cycles
- Navigate to Settings > Common Information > Billing Cycles.
- Click +Add New to add a billing cycle. This is going to set per Supplier and define the way that you run the statements.

Assign Billing Cycles
1. On the Counterparty profile click Edit > Billing & Payments > Select Use Reverse Billing.
2. Update the other Settlements drop downs and Save your edits.
- Reverse Billing Cycle pulls from the Billing Cycles you had set up earlier.
- Reverse Billing Report is the type of statement that gets sent to the client.
- Report Unit of Measure is the unit of measure that this report is run by.

How to Run Reverse Billing
1. On the left hand menu, under Accounting> Billing, hover over the line to reveal the + icon next to Reverse Billing. Using this icon will open a page to run all of your reverse billing statements in one action.
2. You will now be able to filter the inquiry as needed.
- The Posted Date Range defines the date range you want the system to find any open payables, for the suppliers that you have marked as 'Use Reverse Billing' on their counterparty set up.
- The checkmark 'Include adjustments before this period.' looks for any purchase adjustments from before the specified date, so they can be included in this batch.
- If you are using only one Department, then this will default, but if your system has multiple departments, you will need to specific which department you are running this by.
- The Billing Cycle matches the one you created under Settings > Common Information. It will only look at the supplies with the same billing cycle as you select.
- You can further limit the number of open payables by selecting a Sales Rep that is on the brokerage or receiving ticket.
- Whatever you enter in the Set Invoice No field will be the name of the statement document and can later be used to search for it in your accounting system.
- The Invoice-Date and Post-Date can be set to whatever you need. Most clients, for example, use the last day of the month for the Invoice-Date field.

3. Select Generate Statements to populate the report.
- The Details column provides a count of the unique number of payables included in each statement.
- Post Type allows users at a glance to see if a payable should be flipped. Any statements marked AP are positive and can be left as-is, but any statements marked AR should be flipped. This can be done directly from the Reverse Billing inquiry.
- Send your bills by supplier in bulk to your accounting system using Post All Statements. This will create a voucher in the Voucher Inquiry for you.
- The Delete Batch button will delete the full batch in its' entirety, and will not save the batch to refer back to at a later point.
NOTE: Statement lines can be deleted individually from the report as needed.
- Print All Statements will allow you to print a batch of statements to review for accuracy. Any statements with issues can be deleted off the inquiry as needed.
- Email Selected Statements can be used when statements in the inquiry are checked off. Emails will be sent individually in bulk at once to the contact listed in the Email column.
 4. Once you've sent out your statements, users can view settlement statements from the Reverse Billing tool by navigating to Reports > Settlement > Settlement Statement. The statement can be referenced by using the AP Voucher No that was generated.
Reverse Billing will allow you to post negative accounts to AR, which will create offset worksheets in APPROVED status. At that point you will be able to run the Batch Invoice tool to generate your invoices in bulk, or you can navigate to the individual offset worksheets to generate and send the Service Invoice document.
If you have additional questions, please contact the Support Team via email to support@cietrade.net