Receiving Inventory
The Receiving worksheet represents a movement of material into your warehouse. Costs associated with the transaction can be recorded on the Receiving worksheet to create and track payables for your expense vendors. These costs will also be capitalized into the landed value of the inventory items received.
NOTE: One receiving worksheet is equivalent to one load unloaded at your warehouse. Users should not combine the details for multiple containers or truckloads on the same worksheet.
To create a new Receiving worksheet, navigate to Inventory > Receiving and click the New Receiving button provided in the top right corner.
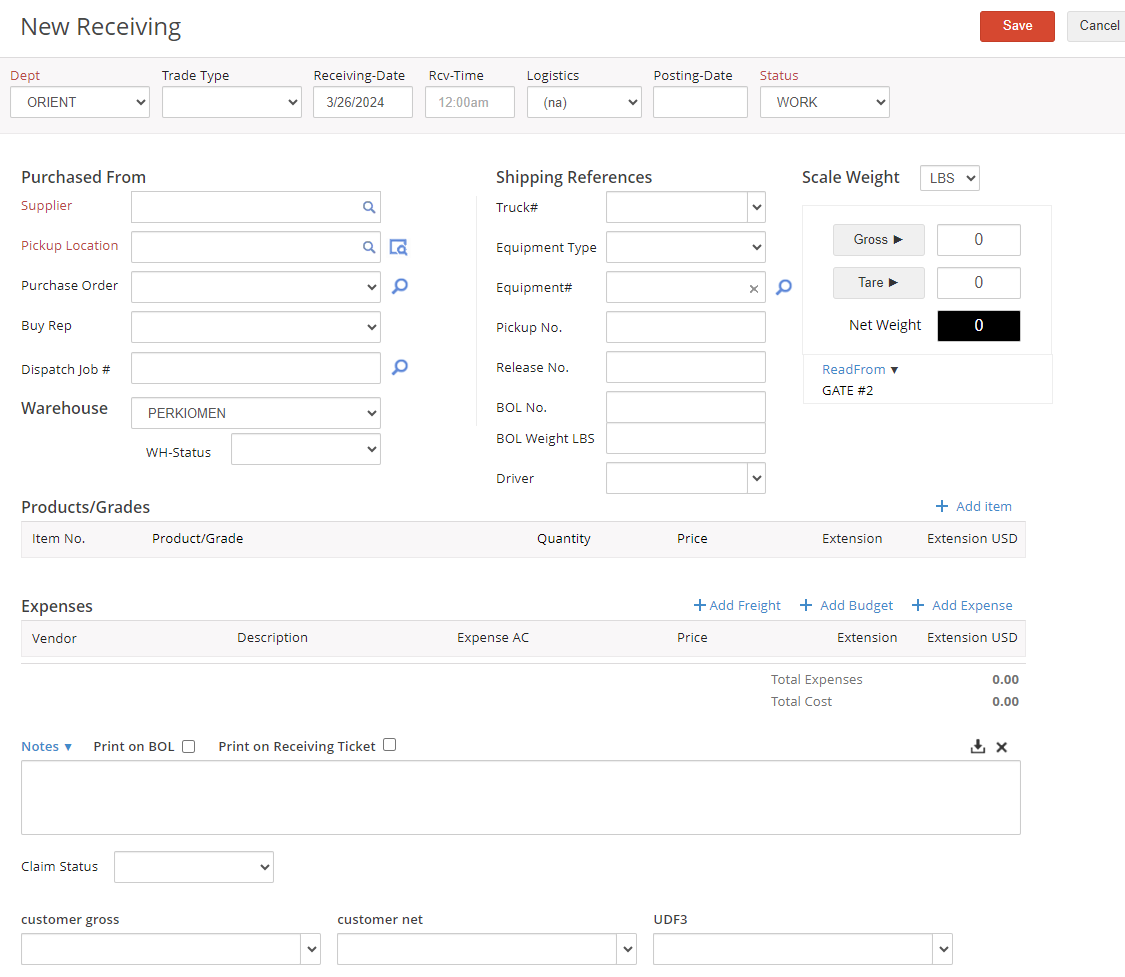
Start by completing the reference fields across the top of the Receiving worksheet.
The Dept and Trade Type fields are optional and are used to track financial information for distinct divisions of a company and/or distinct financial centers related to the expenses created by the worksheet.
Use the Receiving Date field to indicate the date on which the material was received into the warehouse.
Use the Logistics drop-down menu to set the Shipping Status of this load. In the beginning, this load will likely be in Setup status.

Once you have been notified that the load is going to ship or arranged transportation, you can update this status to Dispatched and finally, when you receive confirmation that the load has moved you can update the status to Shipped. The Arrived and Received shipping status' may also be useful, depending on the size of your operation.

The Status drop-down is used to indicate whether the receiving worksheet is in Work, Completed, Approved, Posted, or Cancelled status. This field can be used to indicate the status of the load at various stages of your workflow, and can be used to support an internal review process. Since you are first setting up the load, set this status to Work for now.
The Posting Date populates automatically with today's date when the worksheet is moved into a POSTED status. This is a 'financial' date that represents when the expenses on the allocation impact inventory values.
Use the Warehouse drop-down menu to select the location where the material is being received. The WH-Status is only applicable if you are using the Warehouse module. Visit our help file here for more information on this additional feature.
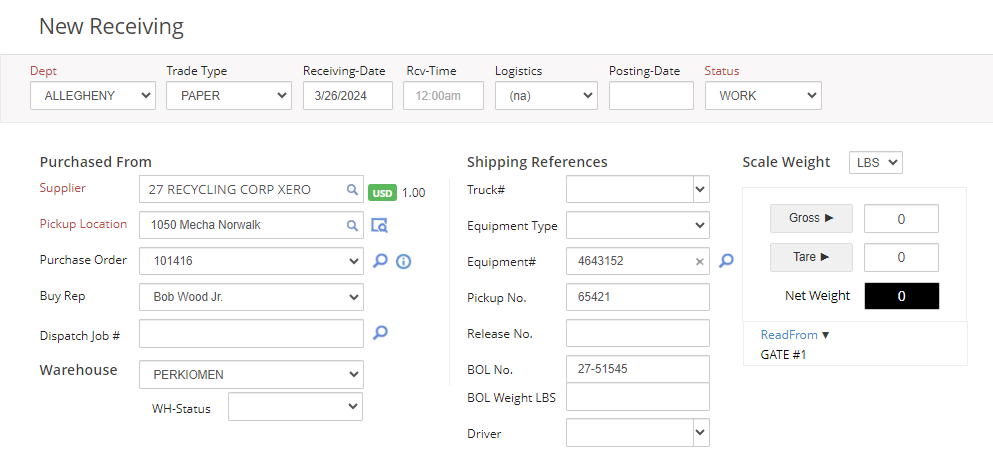
In the Purchased From section, select the Supplier that is providing the material and select the Pickup Location from which the items are being received. You can use the lookup to search for your applicable Purchase Order and link it to your worksheet. The Buy Rep can pull in automatically from the selected Supplier or linked Purchase Order, or may be set manually if desired.
The information bubble will show next to the Purchase Order if one is linked. This displays Purchase Order shipping information.
NOTE: The second date is a user-defined date field, so that may vary based on your database setup.

Use the Shipping References section to enter additional details about the load, such as your Supplier's provided Pickup No., the Equipment No., and/or the BOL No. provided by the shipper. The Equipment Type and Driver are optional fields.
The remainder of the receiving worksheet is broken down into two parts:
- The Products/Grades section is where the item or items being received will be recorded.
- The Expenses section allows for the recording of an expense or expenses associated with this receipt of inventory items, such as freight or warehousing fees.
Building Out Your Product/Grades List
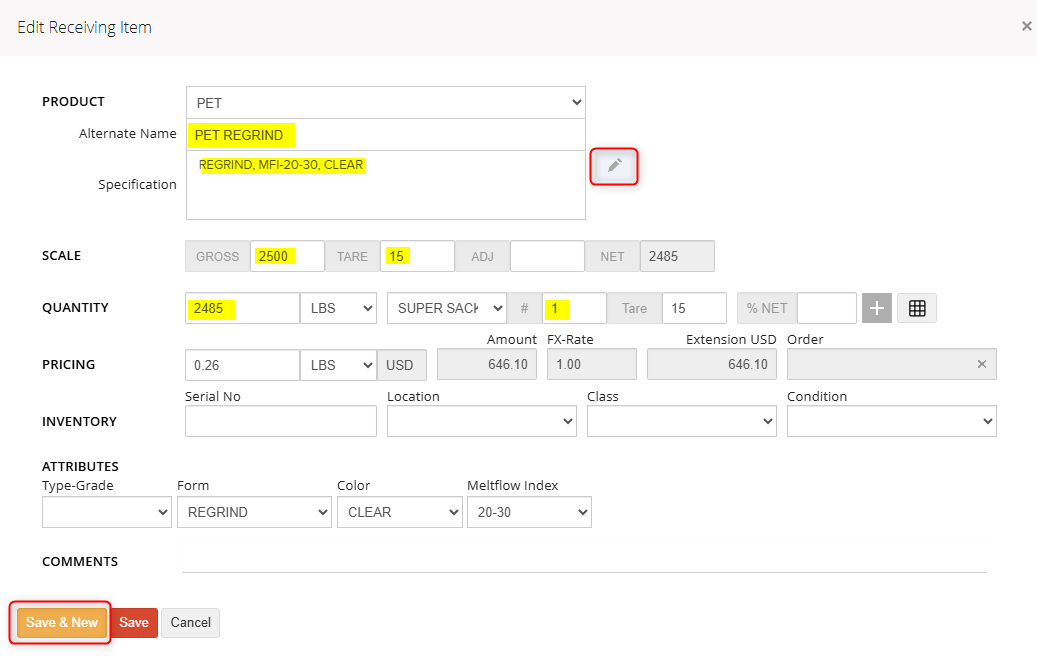
To add items to the receiving worksheet, click the + Add Item button in the Products/Grades section. Depending on the inventory type assigned to the grades you are receiving, there are different ways to fill out this information.

Receiving Serial Grades
- Select the Product/Grade being received from the drop-down menu.
- You may enter an Alternate Name if the item being receiving is known as another grade to your supplier or if you want to mask the name for your supplier. The alternate name will be displayed on all related documentation for your supplier, while still allowing the item received to be tracked in your inventory as the grade selected from the Product/Grade drop-down.
- If there is an alternate name staged on the linked purchase order, this name will pull through automatically for any contract grades listed on the receiving worksheet.
- Selecting the Contract Grade will ensure that the items receiving on this Receiving Ticket will be linked back to the Purchase Order. This will allow a user to track order fulfillment in the Order Management module.
- cieTrade.net has the flexibility to handle paper or plastics Specifications, such as melt flow index. These specifications will appear on any documentation you generate from the receiving worksheet as well (e.g., the Bill of Lading Short Form). The specification fields will appear at the bottom of the detail window when the appropriate Packaging Type is selected.
- Once the paper or plastics specifications have been entered, clicking the pen icon to the right of the Specification field button to pull a text version of the specifications entered.
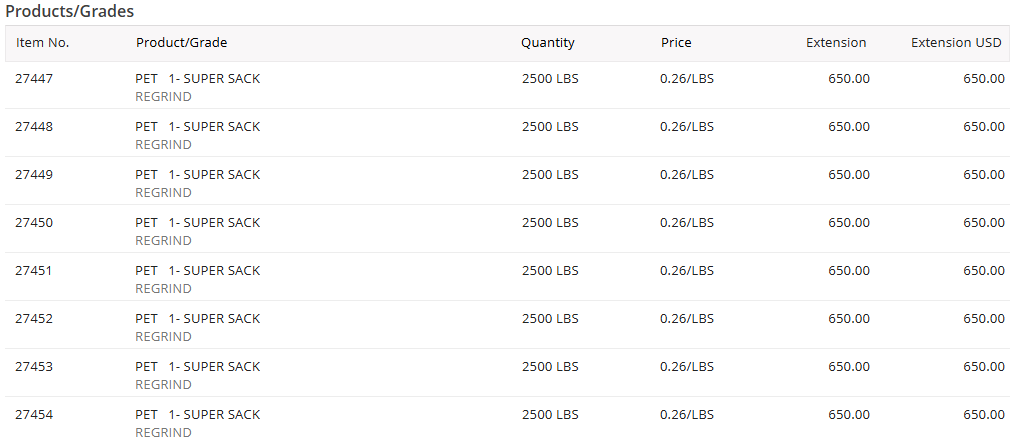
- If receiving serial items, enter in a packaging quantity in the # field as 1 and enter the weight of each individual package in the Quantity field. You must create a separate product line per package in order for cieTrade to generate a unique item number for each package.
- The Scale feature can be used to calculate the Net weight of the product being received. Simply enter a Gross and Tare weight (or allow the tare weight to populate automatically from the selected packaging type), and the system will calculate the Net weight of the lot. This value will then populate automatically in the Quantity field.
- The Inventory section allows you to track a unique serial number, warehouse location, class and condition associated with that particular lot.
- If you need to record multiple items with the same product name and specifications, click Save & New and the system will clear out the weight and serial number, but keep the rest of the information so you can easily add the details for the next lot.
Receiving Bulk Perpetual Grades
When receiving bulk items many of the fields can be filled out similarly. The main difference is that you are creating one Product/Grade line per grade, rather than individual lines per package.
NOTE: Multiple grades can be received still on the same worksheet. The worksheet will have one line per grade with total weights and packaging counts per line.
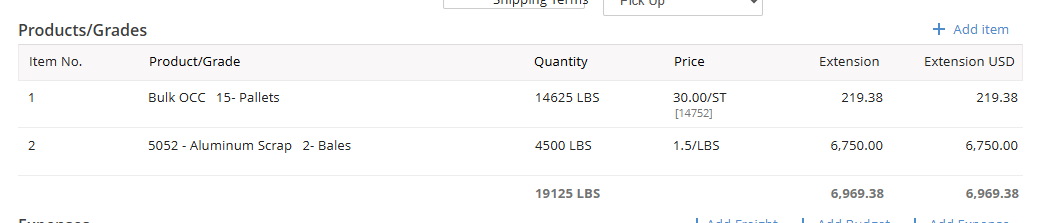
- Enter the total weight of the grade selected in the Quantity field. This will create one line item for the entire quantity of the product being received.
- If you need to deduct a package tare weight, you can use the Scale weight fields and the system will generate the NET weight for you.
- Add the total quantity of packages pulled off the truck for this grade in the # field.
- If a standard tare weight was set up for the selected packaging, it will appear in the Tare field in the Quantity row. The system will then calculate the total tare based on the # of packages received and the per-package tare. In this example, 15 x 25 = 375.
- The Gross weight can then be added in the Scale GROSS field, so that they system will calculate the NET weight for you.

Receiving Bulk Non-Perpetual Grades
Receiving bulk non-perpetual grades looks exactly the same as bulk perpetual. However, a grade allocation will be required at the end of the month in order to apply a percentage of the net weight of your load to a specific grade that was sold. The Grade Allocation tool can be located under the Inventory module. More information on this process can be found by visiting our help file here.
Adding Expenses
To add expenses to the receiving worksheet, click the + Add Expense button in the Expenses section.

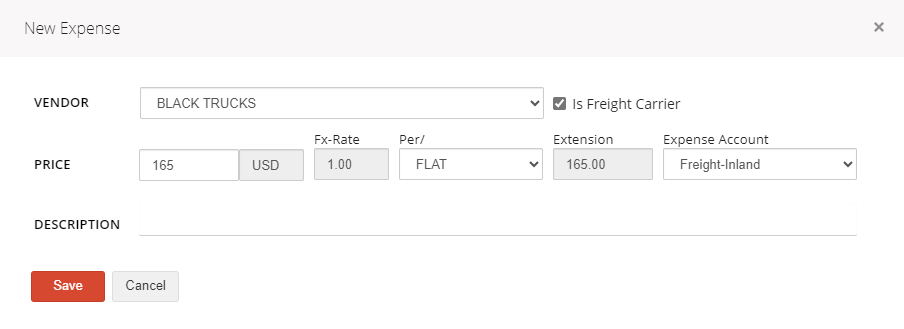
Use the drop-down to select the Vendor that will be invoicing for the expense. If the selected vendor is a Freight Carrier, the checkbox will be populated automatically.
Enter the anticipated Price and Per/ unit of measure (e.g., FLAT, per LBS) for this expense. If a per weight unit of measure is selected, the price entered will be calculated off of the total quantity of your Inventory Items (discussed below).
Once a vendor is selected, the vendor's default Expense Account will populate. If necessary, select the appropriate expense account based on the expense being entered.
The Description field can be used to record a short explanation for the expense, such as 'Freight' or 'Handling Charge', which may appear on some documentation.
Finalizing the Worksheet
After the information on the receiving worksheet has been entered completely, the status should be updated to COMPLETED if the worksheet must be reviewed and to POSTED in order for the inventory items to be available and to accrue the necessary payables for your vendors. These payables will be created directly in the AP Ledger and will be available for posting as soon as the worksheet is saved in the posted status.

If necessary, a posted receiving worksheet can be reversed in the following conditions:
- It must have been posted within the current open period.
- The associated payables must not have been paid yet.
- The inventory items must not have been shipped out yet or consumed on a converting job.
To re-open a receiving worksheet, simply click the Edit Receiving button in the top right corner and then change the status from POSTED to WORK. Saving a previously posted receiving worksheet in work status will remove the associated expenses from the AP Ledger and removed the associated item(s) from available inventory.
If you have additional questions, please contact the Support Team via email to support@cietrade.net.